130 - Tutorial: Dwalin!
Mae govannen, mellon nín!
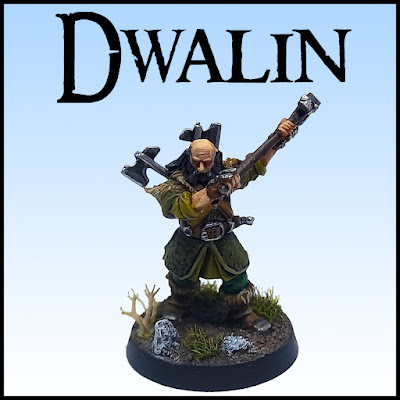
Welcome to another tutorial my friends. The eleventh dwarf of this series of tutorials will be Dwalin!
Up until now these are the already painted dwarves:
Oin | Gloin | Fili | Kili | Bifur | Bofur | Bombur | Ori | Dori | Nori
This guy was fun to paint. I always enjoy playing with different tones of the same colour (green, in this case).
 |
| Assembled and unprimed miniature of Dwalin. |
Who is Dwalin?
"Dwarf of Thorin and Company. Dwalin was the son of Fundin and the brother of Balin.
He went on the Quest of the Lonely Mountain that re-established the Dwarf Kingdom under the Mountain at Erebor, where he remained until the end of his life.
It was the second such quest for Dwalin, for he had been a companion of King Thrain II, the Dwarf-king in exile, a century before, on the disastrous journey to Erebor which led to the king's capture and eventual death."
Source of description: David Day, Tolkien, the Illustrated Encyclopaedia.
How to Paint Dwalin?
As usual, I started by painting the miniature's skin. The steps are exactly just like I did with Ori.
II: Highlight the hair and the beard with a light grey;
III: Glaze those grey tones with a black wash;
IV: Basecoat the pants with a vibrant green tone.
V: Basecoat the armour with a desaturated earthy green tone;
VI: Basecoat the inner tunic with a light yellowy green paint;
VII: Shade the armour and the tunic with a brown wash;
VIII: Shade the pants with a black wash.
IX: Mix a bone toned paint with the same green used to basecoat the armour and carefully highlight the edges of the armour;
X: Basecoat belt (don't forget the axe straps and grips like I did), gloves, boots and fur with a clear brown;
XI: Shade the previous parts with a brown wash;
XII: Highlight the fur and the axe grips (which I mistakenly wrote "scabbard") with a lighter brown. You can either drybrush or pick the strands of fur single-handedly. I did the later, but that will consume a bit of time.
XIII: Pick the majority of the fur strands with an ochre brown;
XIV: Pick the most prominent strands of fur with a bone toned colour. Highlight also the boot-straps;
XV: Basecoat the hammer shaft with a wood toned brown. After it dries, mix the bone toned paint with the brown and apply it to the upper part of the shaft;
XVI: Basecoat the metal parts with a dark silver (don't forget the belt buckle, the tips of the boots and the gloves).
XVII: Shade the metal parts previously painted with a black wash;
XVIII: Highlight all the metal parts with a light silver paint.
After all these steps, the miniature is ready to be varnished and to have its base finished.


Comments
Post a Comment