
Painting: Rock on Bases

Mae govannen.
Be welcome to another post my friends!
The Uruk-hai campaign continues, and this little post will aim at showing how I painted the rock base of my Uruk-hai warriors captain.
If you have stumbled upon this post and wish to check some other Uruk-hai painting tutorials, you can check the following posts:
Isengard Bases | White Hand of Saruman
Feral Uruk-hai | Uruk-hai Crossbowers | Uruk-hai Berserkers | Mauhúr
About painting rock...
When painting rock, or natural elements in general, we need to achieve a multitude of earth tones to resemble the "chaotic" mixes, tonalities and features which make that same nature.
Well, nature isn't obviously monotonic and even, so the greens, browns and greys aren't all the same tone. We should aim at using a lot of different shades and tones of the same colour.
Having that in mind with my Uruk-hai bases (the warrior captain and banner-bearer), I tried to give both weathering and texturing to the rocks with a mix of shades in a rather chaotic manner, which means working further steps with undried paints on the mini (a lunatic sibling of the blending method).
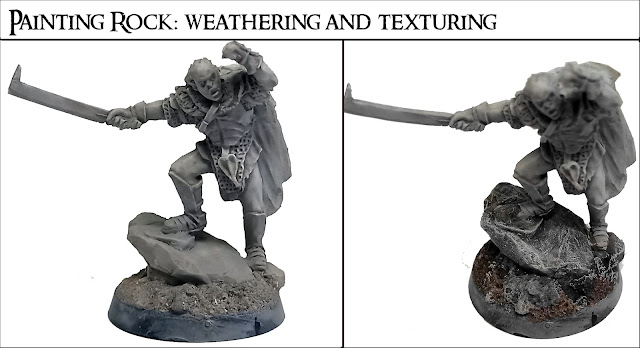 |
| On the left, the sanded and primed captain ready to be painted; On the right, the painting of the base is finished and ready to have it's flora applied. |
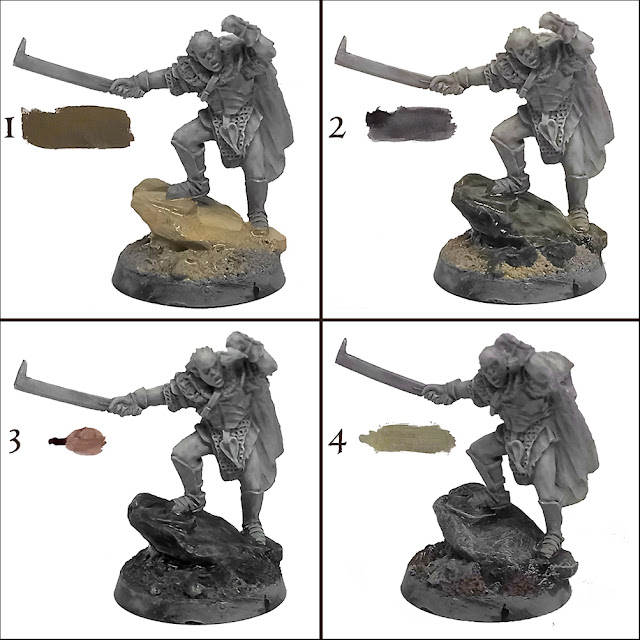
The four steps displayed above are plainly easy to grip: the first three are meant to be done in a row (notice the glowing of the undried paint in every image), while the last one needs the paint to be absolutely dry (to apply a drybrush).
- Basecoat the entire rock and some ground places with a brown-grey paint. (Vallejo's Medium Grey)
- While the basecoat paint is still wet, apply a black-wash focused on the recesses of the rock to shade them. (Vallejo's Black Wash)
- While it all is still wet, weather the rock by tinting the desired spots (at choice) with a brown-wash. Leave it all to dry - it make take a while. (Army Painter's Strong Tone)
- Apply a drybrush with a light-grey paint. This step may be submitted to different drybrush steps with different tones of grey, and finished with a very light drybrush of white.
Et voilà, the painting of the rock base is finished and the mini to be painted!
Showcase


Comments
Post a Comment