
Isengard Bases: "Seas of Grass"

Mae govannen.
Basing the miniatures is a fundamental part of this hobby (just as important as painting them, I should say), and we all need to decide how we want our army bases to look before we start to properly work on them - evidently, bases from the same army should all look alike, theoretically.
When deciding how my army bases should go, I'm usually faced with one master question:
- Should they resemble the battlefield the minis are on, or should they resemble the native/origin land of the warriors?
I tend to choose the native land of the army when deciding its look, but it isn't carved in stone. For example, when I paint Mordor Orcs, I always base them with a lot of dark stone and sand (and minimal or non-existent flora) to get that volcanic look.
On the other hand, for my Isengard army, there were two options upon the table:
- Should I base them with a "industrial" land, with greys and sand-browns to resemble the dried fallen land of inner Isengard?
- Should I base them with a green and dark-brown battlefield look to resemble the land of Rohan, where all the action takes place?
I decided to go for the second option. In my mind, the Uruk-hai miniatures have a lot of dynamic poses that should be placed on proper battlefield, instead of their master's headquarters.
So, Rohan battlefield it is! But how?
Tolkien described Rohan as being "like seas of grass", and that's a good starting point to get inspiration for my bases. There are some problems though: miniature bases look terrible when full of static grass (to my eyes, at least) and they need some diverse elements to look good. My answer to these "issues" was simply to go for a fertile type of land, which means brown earth, some clear stones, bright-green grass and some green elements of taller flora.
For these Rohan bases and aside Tolkien's description, I took inspiration on the 2001/2003 films shot in New Zealand and also on a region from my own land (Portugal), called Alentejo.

There is just one last subtle decision I made for my Isengard army bases: the Uruk-hai scouts and their leaders (like Mauhúr and the commanders) shall have a little more taller flora than the rest of the army, since their main action takes place in Emyn Muil (Amon Hen), a forest type of terrain.
Basing Isengard

First of all, let's get to the materials:
- Fine sand: I am lucky enough to live in a country with a lot of beaches with fine sand so, that's where I get mine. When basing miniatures, the finer the sand is, the better.
- Bright-green static grass: for the "seas of grass" of the Rohan landscapes.
- Scorched-green static grass: to mix with the bright-green grass and tone it down a little.
- Dried moss: I don't know about other countries, but in Portugal people become hobbyists during the month of December, constructing their own Christmas Crib dioramas. The dried moss jumps at a cheap price in a lot of stores, and I always take advantage of that.
- Decorative stones: Should be small enough to get 2/3 to cover not more than 1/4 of the base. These can be bought either on home decoration stores or on animal stores in the fish tank areas.
- Pieces of cork: On alternative to the decorative stones, just keep your wine-corks and grind them with an x-acto knife into small pieces. Cork makes amazing stones!
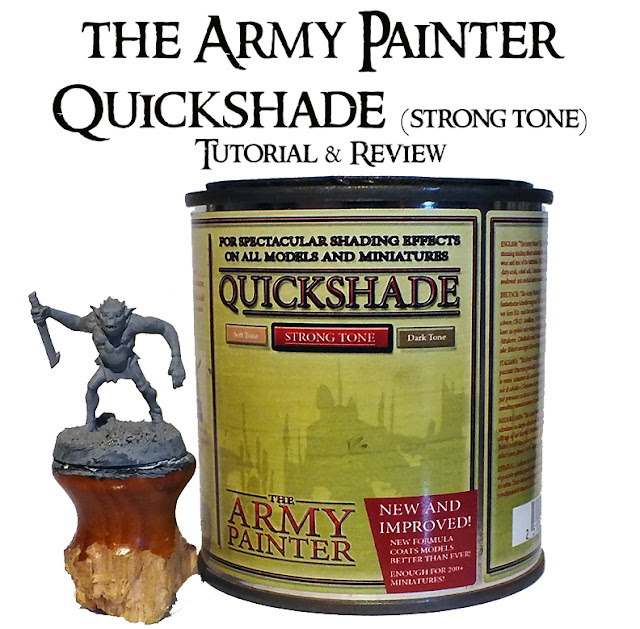
- Dark-brown wash paint: I use the Army Painter's strong tone ink because it is rougher and works greatly with the sand of the bases.

- Gluing the miniature to the base: This is a resin miniature, so the binding used here was superglue (if the miniature is made of plastic, then superglue or plastic-glue can be used).
- Gluing the decorative stones (or cork) to the base with superglue: Every mini is a different mini, so I always try to choose random, diverse spots of the base to glue the stones.
- Gluing the sand across the base with white-glue: I thin-down the white-glue a little so it flows easily through the base; then, with the help of a spoon, I pour the sand over the base and let it dry immersed in the sand (only the base!!!!). The drying should take about 15-20 minutes.
- Strengthening the bond of the sand and the base: This final step of the binding is crucial if you don't want grains of sand floating around your mini while painting it. I simply thinned-down white-glue to the consistency of milk (it should drip from the brush) and brush it over the sand and stones to crate a hard layer to the base. When it dries, the sand will be firmly bound to the base.
- Priming and painting the mini: After the previous four steps, the miniature will be ready to primed and painted. I always prime the base along the miniature (in this case, with grey). I also paint the rim of the base black.
- Drybrushing the stones: I usually go for a white drybrush to make the stone really stand out. There can be used various shades of grey instead of the white.
- Tinting the sand and weathering the stones: I wash the entire sand of the base with the Army Painter's strong tone ink. This paint gets into the crevices and also tints the upper parts of the sand grains. Then, I take a good look at the stones and decide were should I apply the brown weathering wash. This final step needs to be austere since you don't want to splash the wash all over the stones.
- Grassing and bushing the base: The final step aims at building the flora of our miniature's base. As mentioned above, I want to get a lot of grass on my Isengard bases, so I'm aiming at 2-3 grass tufts per base and 2-3 taller flora. The binding used is white-glue non-thinned, and the taller flora is achieved by cutting the ends of the dried moss to no more than 1cm.
I just look at the base, decide where everything need to go, and place dots of white-glue on the desired places. Then I place the moss and pour the static grass with some clippers and let it dry.
 |
| Final stage of the base. |
Showcase on Other Miniatures


Comments
Post a Comment