
Painting: Mauhúr

Mae govannen.
Welcome to another post, my friends!
This time I'm painting Mauhúr, a Uruk-hai hero and one of the scout's commanders. There are some sentiments at stake when people talk about this miniature (a lot of people hate that ponytail thing), but I actually think it is an amazing mini. One of the best in Isengard!
This miniature follows a few posts I have been making from what I called the "Uruk-hai season":
Isengard Bases | Feral Uruk-hai | Uruk-hai Crossbowers | Uruk-hai Berserkers
About Mauhúr, there isn't much that can be said. He is one of the commanders aiding the scouts that return from Amon Hen after kidnapping Merry and Pippin. Bellow, there's a passage from the Lord of the Rings that mentions him: Uglúk, the captain responsible for the attack at Amon Hen, speaks about the Rohirrim to his fellow uruks, on the eaves of Fangorn forest (we all know how it ended).
How to paint Mauhúr?
As you'll see, I've changed the format of my tutorials a little as I believe it is beneficial to change things from time to time.
I will still mention the colours and brands that I have used for the tutorial in parentheses but, as with every paint, there aren't 100% correct formulas and so the brands I use aren't really a "must have" for these particular tutorials. Anyone should use what they have and mix the paints if need be - mixing paints is actually the greatest method of achieving the desired colour tones, in my honest opinion.
 |
| Assembled and primed miniature of Mauhúr. |
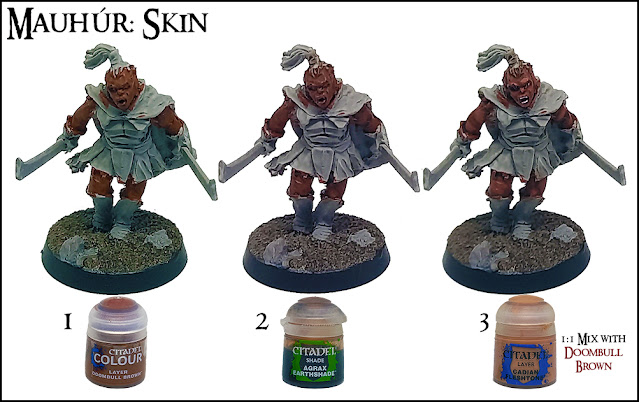
Like I did with the rest of the uruks, Mauhúr's skin follows a typical pattern:
- Basecoat with a red-brown paint (Citadel's Doombul Brown).
- Shade the skin with a brown wash (Citadel's Agrax Earthshade). After it dries, and if you're feeling brave enough, you can try to paint the eyes with small dots of white and a black stripe in the middle.
- Highlight the most prominent parts of the skin and face (eyebrows, nose, cheek-bones upper lip and chin) with a 1:1 mix of the red-brown paint with a light skin-tone (Citadel's Cadian Fleshtone).

When the skin was done, I went for the leather cloth (and the hair band also). Trying to distinguish the scouts from the rest of the Uruk-hai's cloth (useful to spot them on a tabletop game), I painted it with a lighter, yellower tone:
- Basecoat the leather cloth with a dark-brown paint (Citadel's Rhinox Hide).
- Highlight the most prominent parts with a beige-brown colour (Citadel's XV-88).
- Edge-highlight and try to pattern the leather with small strips of a bone-brown colour (Citadel's Screaming Skull).
- Glaze the browns with a thinned-down brown wash (Citadel's Agrax Earthshade).

When skin and cloth were dealt with, I started to work on the blacks, which means the hair, the gloves and the cloak: The basecoat was evidently done with a black paint.

These were the steps I followed to work the black tones:
- Highlight the bulk of most prominent parts of the cape and gloves, and pick some hair strands with a dark-grey colour (Vallejo's Dark Grey).
- Highlight further the same spots but in a smaller area with a lighter but still dark grey (Citadel's Stomvermin Fur).
- Final highlight the cloak and gloves using a light-grey colour in very small located spots - edges and distinctive prominences (Citadel's Administratum Grey). You can also pick some strands of hair by gently drybrushing it.
- Glaze all the greys with a black wash (Citadel's Nuln Oil).

With all those parts done, Mauhúr is left only the metallic parts (armour and swords). For the armour, I decided to give this miniature a weathered look (since he's a scout) by painting his armour with a brownish metallic basecoat. So this is what I did:
- Basecoat the armour with a dark iron-brown metallic paint (Army Painter's Rough Iron).
- Highlight the edges of the armour with a dark-silver metallic (Army Painter's Gun Metal). You can also try to paint some thin scratches on the armour.
- Paint some more thin scratches and dents on the armour with a light-silver metallic paint (Army Painter's Shining Silver).

For the swords, the method used was as follow:
- Basecoat with a dark-silver metallic (Army Painter's Gun Metal).
- Shade and tone-down the swords to an even darker tone with a black wash (Citadel's Nuln Oil).
- Edge-highlight the edges of both swords with a light-silver metallic paint (Army Painter's Shining Silver). Some battle-scratches can also be done here, I just decided to let them clean.
After all these steps Mauhúr is ready to be varnished and to have its base finished.
Showcase


Comments
Post a Comment