
Painting: Uruk-Hai Berserker

Mae govannen.
Welcome to another blog post, my friends.
Following the previously painted Uruk-hai Crossbowers, this time I will make an introduction, painting tutorial and showcase of the mighty Isengard warriors we know as the Berserkers!
Who are the Uruk-hai Berserkers?
 |
| Depiction of a Berserker (Peter Jackson's the Lord of the Rings trilogy) |
Well, the Berserkers have no place on J.R.R.Tolkien's Canon, being an [good] invention of the director of the film trilogy, Peter Jackson, and his team.
But looking through our own history, it is interesting to note that the medieval norse berserkers (ber+serkr = bear+coat) are believed to have been a kind of battle fanatics, that fought unarmoured (with only a bear pelt on them) and got to their frantic mind-set by consuming hallucinogenic mushrooms pre-battle.
Through that perception we can really understand the whole idea behind the Uruk-hai Berserkers: unarmoured war-frantics whose craze arise in them by filling the inside of their helmets with the blood of their enemies (well, Rohirrim of-course) and pouring it over their heads.
How to paint Uruk-hai Berserkers?
 |
| Assembled and primed miniature of a Uruk-hai Berserker. |

There aren't too many metal parts for this miniature: just the helmet, the two-handed sword and the chainmail across his waist. The steps are as follow:
- Basecoat the metal parts with a dark silver (the darker, the better);
- Shade the recessed os the metal parts with a black wash;
- Highlight the edges of the helmet and blade, and drybrush the chainmail with a light silver paint.

As mentioned above, the skin of the Berserker should follow the exact same method of the conventional uruks.
- Basecoat the entire skin with a red-brown paint (old citadel Dark Flesh = Doombull Brown);
- Shade the recesses of the skin and muscles of the miniature with a brown wash;
- Highlight the fingers and prominent parts of the skin with a 1:1 mix of red-brown and a light-skin colour;
- Do exactly the same as the previous step but enhance the usage of the skin colour (1 part red-brown to 2 parts light-skin colour) and apply the highlights on a smaller area.

For the little cloth this miniature displays I have decided to go for a light-leather tone.
- Basecoat the leather parts with a leathery mid-brown paint;
- Highlight the edges of the leather parts with a bone-brown paint;
- Glaze the previously used browns with a thinned-down brown wash (preferably using a thinner medium).

There's only the gloves left to finish painting the Berserker - applying the blood isn't really "painting", but more like a technical approach. In this case we will use greys to stand out the black leather. (I forgot to photograph it, but the basecoat of the gloves was done black)
- Highlight the gloves with a dark-grey (again, the darker the better);
- Highlight them further, in a smaller area, with a light-grey;
- Glaze the gloves with a thinned-down black wash (preferably using a thinner medium).
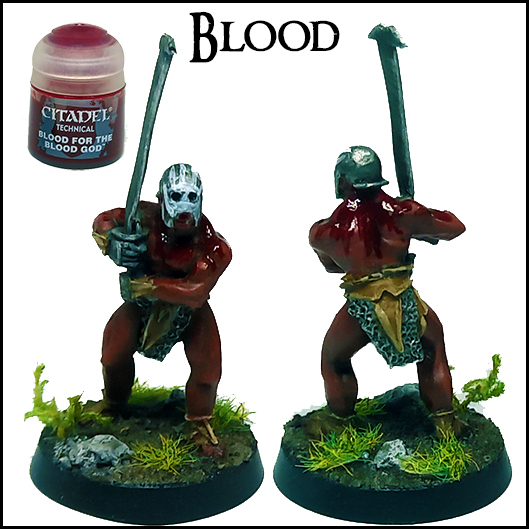
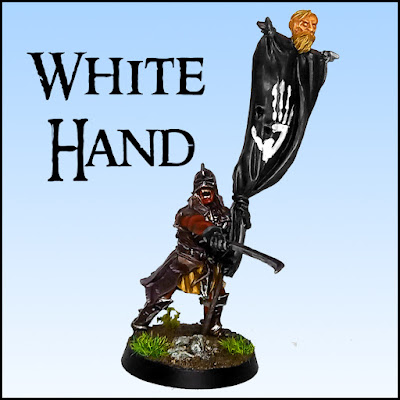
Finally, our Berserker needs the fuel it's made of: the blood bath. For this I used Citadel's technical paint Blood for the Blood God (after I painted the White Hand of Saruman on the helmet, which will have a post for its own soon). There's 2 tips I'd like to leave here:
- Use a generous amount of this liquid - unlike acrylics, this "paint" benefits from thickness;
- Make it like the blood is dripping down the helmet unto the shoulders, chest and back of the miniature (you can also use it for the sword and ground, if you feel like it would be cool).
Showcase
 |
| The total of 8 Uruk-hai Berserkers I've painted these days. |


Comments
Post a Comment