
Painting: Isengard Banners

Mae govannen.
Welcome to another blog post, my friends!
My little Uruk-hai campaign continues, and this time I will focus my attention on painting two Uruk-hai banner bearers from both command packs: one warrior and one scout.
This post will not be a full tutorial, but rather a tutorial on how to paint and highlight the colour black, taking advantage of the banners, evidently.
So, if you have stumbled upon this post and wish to check some complete Uruk-hai painting tutorials, you can check the following posts:
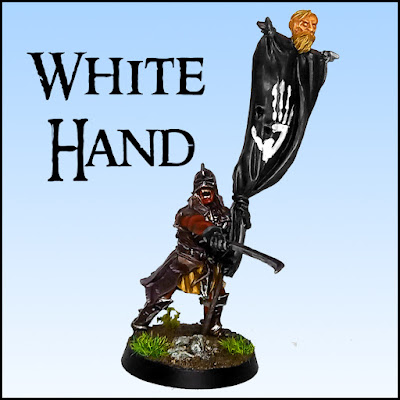
Isengard Bases | White Hand of Saruman
Feral Uruk-hai | Uruk-hai Crossbowers | Uruk-hai Berserkers | Mauhúr
And without further ado...
How to paint Isengard banners?
First of all there's one simple rule I follow when painting black: grey variances make the trick.
For these banners we wish to obtain absolute contrast between black and white so, the dark must be the darker we can get, and the white should be as clear and even as we can. Now, for both miniatures, the first step will be addressing the black tones.
There may be other ways to achieve good looking black highlights (such as with blue), but I usually follow the grey ones ended with a final glaze of black - and that is what I will explain below.
I mention the colours and brands that I have used for the tutorial in parentheses but, as with every miniature, there aren't 100% correct formulas and so the brands I use aren't really a "must have" for this particular tutorial. Anyone should use what paints they have and mix them if need be.

The first banner bearer displayed is the one from the Uruk-hai warrior command pack. As the White Hand of Saruman is in relief on this banner, I had to be cautious with the prolonging of the shadows/lights - not a hard thing to do, but it is something we need to be aware of.
- As usual, the priming was done with grey. You may also go for a back priming.
- I basecoated the whole banner with black, trying to get it evenly and flawlessly covered (this is very important).
- Trying to spot the areas where light hits the most (the vast majority of the banner), I painted highlights to those parts with a dark-grey to help transition the deep shadows of the folds to the lighter parts of the banner. Keep the deeper areas black. (Vallejo's Dark Grey)
- Then I mixed the dark-grey with a light-grey to achieve a gradient between the darkest and the lightest greys. This mix was applied to the same places as the previous step but in a smaller area (right at the middle of the dark-grey). (Vallejo's Dark Grey + Citadel's Administratum Grey)
- After the main highlights are dealt with, it's time to focus on the edges and more distinguishable prominences of the banner. For this I did an edge-highlight with a light-grey, followed by some thin lines on the prominent folds. (Citadel's Administratum Grey)
- Time for a bit of magic: a black glaze to bring all the greys together. For this step I mixed a thinner medium with black paint on a proportion of 3:1. If, in the picture, you think it ended too dark, you can always add one or two more drops of medium to dissipate the black pigment a bit more. (Citadel's Lahmian Medium + Abaddon Black)
- The final step is focused on the White Hands. For this I have used an off-white instead of a "pure" white, simply because I didn't wanted a super light colour which could become too flashy for the miniature. One important thing to note for this step is that the white hands should have an even finish, so I applied 3 or 4 thin coats of paint. If any white paint ends up staining the black of the banner, simply cover the area with black paint. (Vallejo's Offwhite)


Showcase


Comments
Post a Comment